

How to code Pine Script has become an essential skill for traders and investors who use TradingView for technical analysis and strategy development. Pine Script not only allows you to create custom indicators tailored to your own trading style, but also enables strategy backtesting, alert automation, and performance optimization in a professional way. In this article, we will guide you from A to Z on how to code Pine Script on TradingView, making it suitable for both beginners and those looking to advance their trading automation skills.
What is Pine Script?
Pine Script is a programming language developed specifically by TradingView. It is designed to be lightweight, simple, and to run directly on the cloud.
Unlike MetaTrader’s MQL4/MQL5 (which are based on the fairly complex C++ language), Pine Script is optimized for users without an IT background. You can create a custom RSI indicator with just 3–5 lines of code, something that might take an entire page of code on MT4.

Reasons why traders should learn Pine Script:
- Easy to learn: The syntax is extremely intuitive and close to natural English.
- Massive data access: Direct access to data from thousands of currency pairs, stocks, and cryptocurrencies right within the code.
- Ultra-fast backtesting: Test trading strategies in just seconds thanks to TradingView’s powerful servers.
- Alerts: Write your own logic to trigger notifications on your phone whenever a trading signal appears.
See more:
- Guide to using TradingView chart for beginners
- How To Install EA Into MT4? A Step-By-Step Guide
- What is MQL4? The Benefits of Learning MQL4 Programming
- What is MT5 EA? Guide on how to install and use MT5 EA in detail
Pine Editor interface: Where every coder begins
To start how to code Pine Script, you don’t need to install any additional software.
- Open a TradingView chart.
- Look at the bottom of the screen and find the Pine Editor tab.
- Click Open → New blank indicator.
This is your working environment (IDE). After finishing your code, simply click “Add to chart”, and the script will run immediately.
Basic structure of a Pine Script code
How to code Pine Script? Typically, a standard Pine Script (latest Version 5) consists of three main parts:
Part 1: Declaration
This section tells the system whether the script is an indicator (plotted on or below the chart) or a strategy (used for backtesting).
expand_less
//@version=5
indicator(“My First Script”, overlay=true)
- overlay=true: Plots directly on the price chart (like Moving Averages, Bollinger Bands).
- overlay=false: Plots in a separate pane below the chart (like RSI, MACD).
Part 2: Inputs
This allows users to adjust parameters in the Settings panel without modifying the code.
expand_less
len = input.int(14, “RSI Length”)
src = input.source(close, “Price Source”)
Part 3: Calculation & Plotting
Uses built-in functions (TA – technical analysis) for calculations and the plot command for plotting.
expand_less
myRSI = ta.rsi(src, len)
plot(myRSI, “RSI Line”, color=color.blue)
How to code Pine Script
To create a Pine Script, first start by declaring an indicator or strategy using the keyword “indicator” or “strategy”. Next, you need to define the inputs such as the length of the moving average or the threshold value of a specific indicator. Then, set up trading signals or alerts based on the indicator or the indicators used.

For example, a script can be designed to generate a buy signal when a certain indicator crosses above a defined threshold, or a sell signal when it crosses below this threshold. Before applying it to actual trading, you can use TradingView’s backtest feature to check how the strategy written in code would perform under past market conditions.
Below, we will go through examples of how to create indicators and strategies in Pine Script.
How to create an indicator with Pine Script

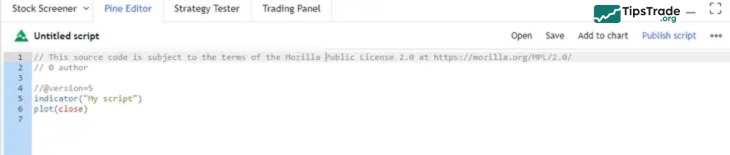
When you open Pine Script, a default setup appears on the screen. The first two lines function as comments and are marked with double slashes (//). The second line automatically displays the author name based on your TradingView account, and these comment lines can be removed if desired. In contrast, the fourth line is not a comment; it specifies the Pine Script version being used.
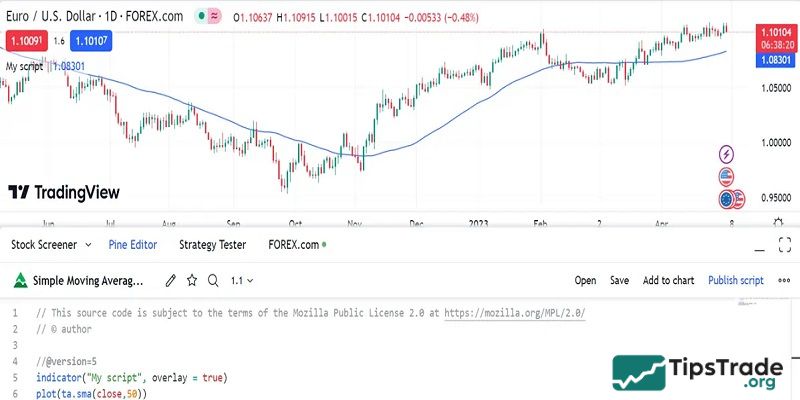
The fifth line is used to declare the type of script you are creating, such as an indicator or a strategy, and to assign it a title, which is “My Script” by default. The sixth line determines what data will be plotted on the chart. In this case, the variable close represents the closing price of each bar.

Line five has a variety of modifiers. For example, if you’d like the closing price to be plotted on top of the price chart, you can write:
indicator(“My script”, overlay=true)
Designating the overlay as ‘false’ would open the plots of the closing price in a new window below the price chart. This option is the default, so you could exclude the declaration altogether.
If you want to overlay a 50-period SMA over the price chart, you would write:

To see your script in action, press the ‘Add to chart’ button. This will also save your script. Once added to your chart, a control panel will appear in the top left of the price chart.
How to create a strategy with Pine Script
After understanding how indicators are built in Pine Script, we can move on to strategies. In this example, moving averages will continue to be used to design a basic trading strategy. The script below defines a strategy that relies on moving average crossovers, generating buy and sell signals when the price crosses a 20-period moving average.
//@version=5
strategy(“Simple Moving Average Strategy”, overlay=true)
First, swap out the indicator declaration with a strategy declaration.
ma_length = input(title=“Moving Average Length”, type=input.integer, defval=20)
Then, define the length of the moving average.
ma = sma(close, ma_length)
plot(ma, color=color.blue)
These two lines define the plot of the moving average on the chart. The first line calculates the MA, and the second plots it on the chart.
buy_signal = crossover(close, ma)
sell_signal = crossunder(close, ma)
These lines define the buy and sell signals based on the crossover of price and the moving average.
if (buy_signal)
strategy.entry(“Buy”, strategy.long)
if (sell_signal)
strategy.close(“Buy”)
if (sell_signal)
strategy.entry(“Sell”, strategy.short)
if (buy_signal)
strategy.close(“Sell”)
These eight lines define the entry and exit conditions for your strategy.
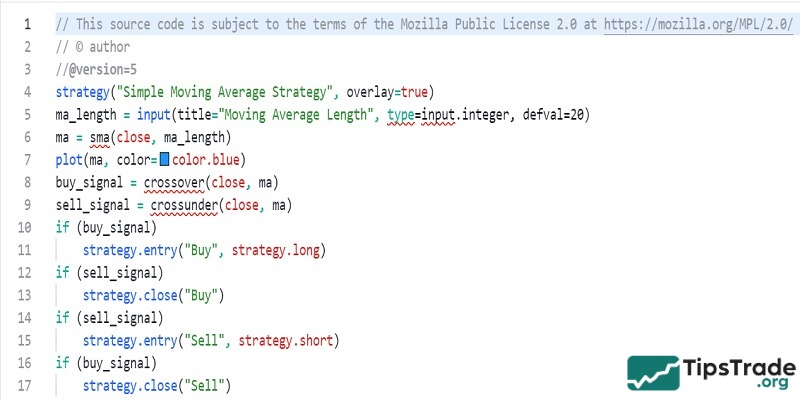
Here is the complete strategy written out in Pine Script. This is a fairly short example, and strategies written with Pine code can become much more complex depending on the number of indicators, conditions, and calculations you include.
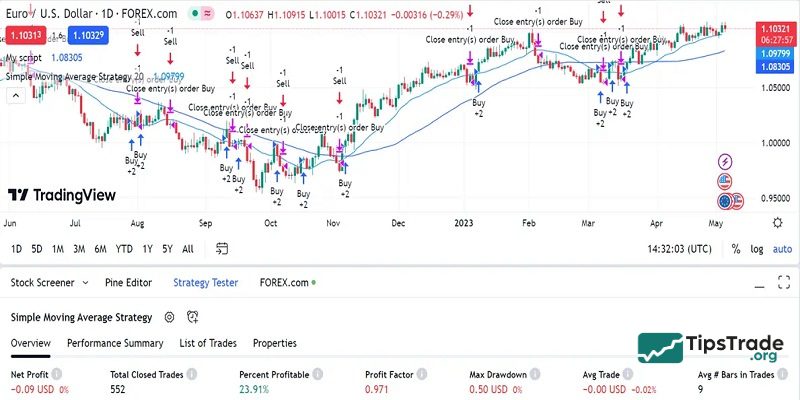
How to backtest your Pine Script strategy
Running a backtest for your Pine Script strategy on TradingView is very straightforward. Open the strategy tester tab above the script window. You’ll then be shown an overview of how your strategy performed in the time period selected including your net profit, total closed trades, and the percent of profitable trades. Check out the above strategy in action and notice the Strategy Tester results at the bottom of the image.
Conclusion
Through this guide, you have gained a solid foundation in how to code Pine Script on TradingView, from understanding the Pine Editor interface and basic code structure to building and backtesting trading strategies. Mastering Pine Script helps you save analysis time, increase consistency, and create your own competitive edge in the market. With regular practice and continuous refinement, Pine Script can become a powerful tool in your trading journey.